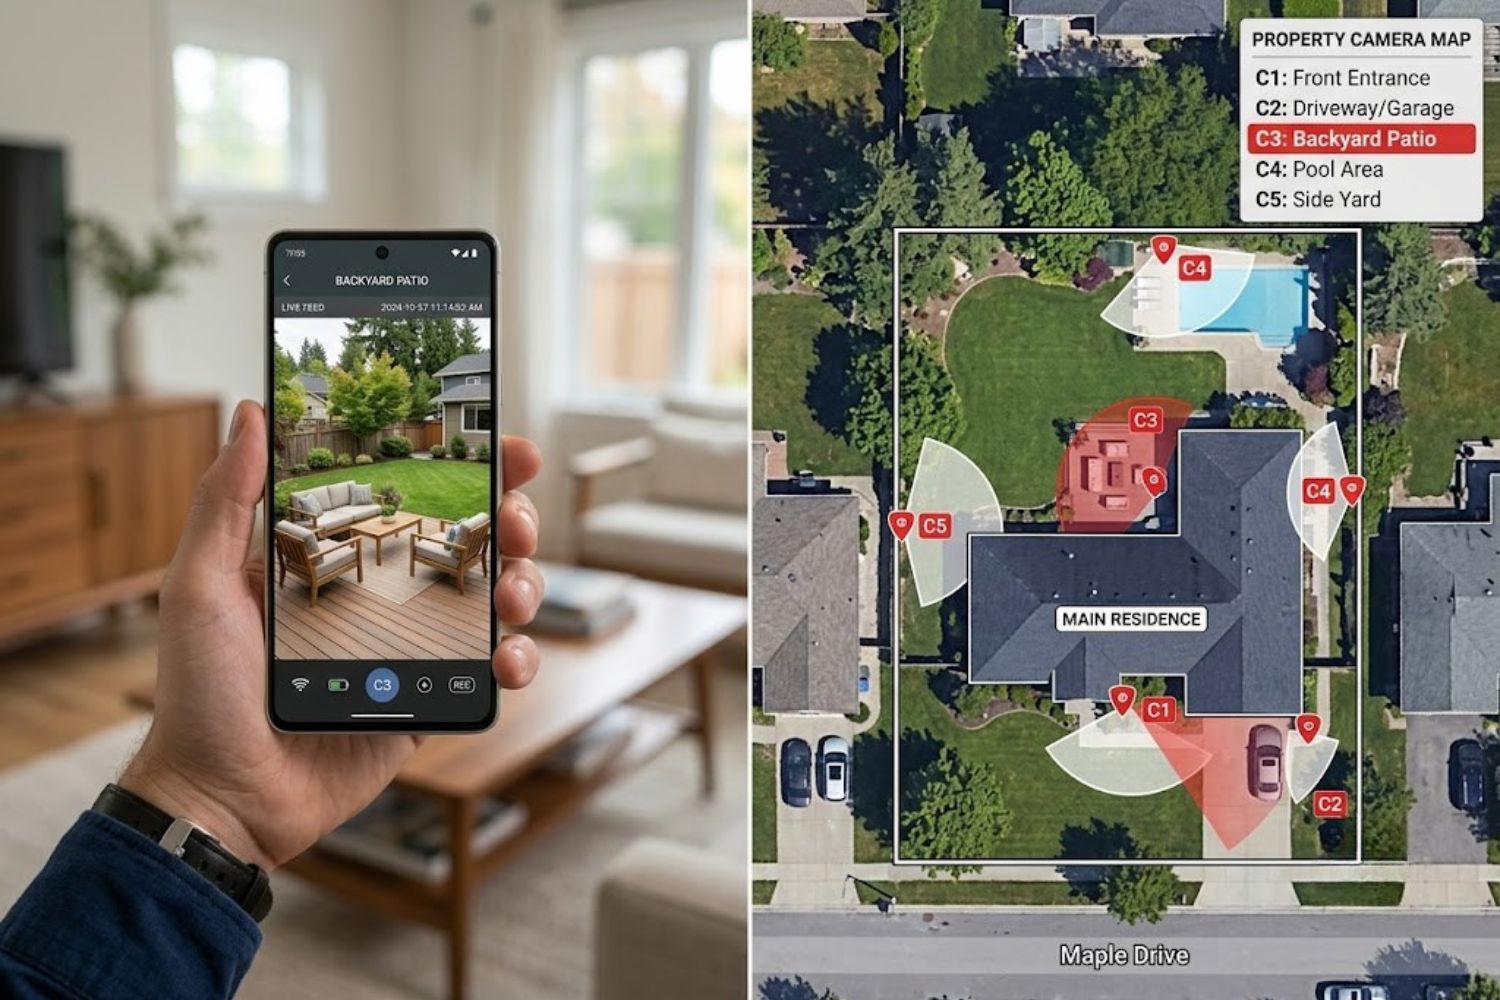
In an increasingly connected world, the ability to monitor your property, home, or business from anywhere has become essential. That’s where camerabewaking apps come in.
Whether you’re protecting your home while on vacation, monitoring your retail store during off-hours, or overseeing industrial facilities across multiple locations, camerabewaking applications have fundamentally changed how security works in 2026.
This comprehensive guide explains everything you need to know about camerabewaking apps—from how they work to choosing the right solution for your needs.
What Is a Camerabewaking App? Understanding Remote Camera Surveillance
A camerabewaking app is a software application that enables remote monitoring, management, and control of security cameras via a mobile device or desktop computer. The term “camerabewaking” originates from Dutch, translating to “camera surveillance” or “camera monitoring.”
These apps allow you to:
- View live video from your cameras in real-time
- Receive instant alerts when motion is detected
- Review recorded footage on-demand
- Adjust camera settings remotely
- Communicate two-way audio through cameras
- Manage multiple cameras from a single dashboard
Unlike passive security systems of the past, modern camerabewaking apps provide active, real-time oversight of your environment—regardless of your physical location.
Understanding the Basics
At its core, a camerabewaking app bridges the gap between your security cameras and your personal devices. Here’s how it works:
- Hardware Connection: Your cameras connect to your network (via WiFi, Ethernet, or cellular)
- App Installation: You download the companion app on iOS or Android
- Real-Time Streaming: The app receives live video feeds from your cameras
- Cloud/Local Storage: Footage is recorded locally or in the cloud
- Alert System: The app sends push notifications for motion, sound, or other triggers
- Remote Control: You can adjust settings and control features from anywhere
The simplicity of this model has made camerabewaking systems accessible to homeowners, small businesses, and large enterprises alike.
Camerabewaking vs. Traditional CCTV Systems
The key difference between camerabewaking apps and older CCTV systems is accessibility and intelligence.
Traditional CCTV:
- Requires physical DVR/VCR access
- Limited remote viewing capabilities
- Manual monitoring required
- Static camera angles
- Limited storage options
- Expensive professional installation
Modern Camerabewaking Apps:
- View footage from anywhere via smartphone/browser
- AI-powered motion detection and smart alerts
- Continuous, automated recording
- Pan-tilt-zoom (PTZ) capabilities
- Cloud storage with unlimited scalability
- Easy DIY installation
- Affordable subscription models
The shift from CCTV to camerabewaking has democratized security monitoring, making professional-grade surveillance accessible to everyone.
Why Remote Monitoring Matters
In 2026, remote monitoring isn’t a luxury—it’s essential. Here’s why camerabewaking apps matter:
Peace of Mind: Real-time visibility into your property reduces anxiety about security threats.
Faster Response Times: Instant alerts allow you to contact authorities immediately if suspicious activity occurs.
Evidence Collection: High-quality video provides irrefutable evidence in case of incidents.
Crime Deterrence: Visible cameras with active monitoring discourage potential criminals.
Operational Efficiency: Businesses can oversee operations without being on-site.
Insurance Benefits: Many insurers offer discounts for homes/businesses with active surveillance.
How Camerabewaking Apps Work: The Technical Foundation
Understanding the technology behind camerabewaking apps helps you choose the right system and troubleshoot issues.
Connection Methods: WiFi, Ethernet, and Cellular
Camerabewaking apps rely on network connectivity to function. There are three primary connection methods:
WiFi Connection
- Pros: No additional cables needed, works with most residential setups
- Cons: Bandwidth limitations, potential connectivity drops, interference from obstacles
- Best for: Home security, small retail spaces, areas with strong WiFi coverage
Ethernet Connection
- Pros: More stable, consistent bandwidth, professional reliability
- Cons: Requires cable runs, less flexible placement
- Best for: Permanent installations, business facilities, critical monitoring areas
Cellular/4G/LTE Connection
- Pros: Works anywhere, no WiFi dependency, excellent for remote properties
- Cons: Higher data costs, potential latency issues, requires mobile plan
- Best for: Remote properties, backup connectivity, areas without WiFi
Most modern camerabewaking systems support multiple connection types, allowing you to choose based on your environment.
Live Streaming Technology
When you open a camerabewaking app to view live footage, several technologies work simultaneously:
Video Compression: Raw camera footage is compressed using H.264 or H.265 codecs to reduce file size without sacrificing quality. This is crucial because uncompressed video would consume massive amounts of bandwidth.
Adaptive Bitrate Streaming: The app automatically adjusts video quality based on your available bandwidth. On a 4G connection, quality might reduce to 720p; on WiFi, you might see 1080p or higher.
RTSP/ONVIF Protocols: Most professional camerabewaking systems use RTSP (Real Time Streaming Protocol) or ONVIF (Open Network Video Interface Forum) standards, ensuring compatibility across different camera brands.
End-to-End Encryption: Your video stream is encrypted during transmission, preventing interception or hacking.
The result? High-quality live footage delivered instantly to your phone, even from halfway around the world.
Cloud vs. Local Storage Options
This is a critical decision when setting up a camerabewaking system:
Cloud Storage
- Footage stored on remote servers (AWS, Azure, Google Cloud, etc.)
- Accessible from anywhere, anytime
- Automatic backups and redundancy
- Typically requires subscription ($5-30/month per camera)
- Better for compliance and legal evidence retention
Local Storage (NVR/NAS)
- Footage stored on premises (hard drive, NVR, NAS device)
- No monthly subscription fees
- Faster performance and lower latency
- Requires manual management and backup
- Better privacy (data never leaves your property)
- Limited by local storage capacity
Hybrid Approach
- Store 7-30 days locally, then archive to cloud
- Best of both worlds: speed + redundancy
- Growing industry standard for serious surveillance
Most camerabewaking apps support both options, letting you choose what works for your security model.
Real-Time Alert Systems
Modern camerabewaking apps don’t just passively record—they actively monitor and alert:
Motion Detection: AI algorithms identify movement in camera frame and trigger alerts within 1-3 seconds.
Sound Detection: Apps can alert you to loud noises, breaking glass, or aggressive voices.
Person/Vehicle Detection: Advanced AI distinguishes between people, vehicles, animals, and other motion types, reducing false alerts.
Perimeter Alerts: Define virtual zones in your camera view; alerts trigger only when motion enters these areas.
Scheduled Alerts: Activate alerts only during certain hours (nights, when you’re away, etc.).
Smart Notifications: Get push notifications, SMS, or email alerts based on your preferences.
This intelligence is what separates modern camerabewaking apps from basic video recorders.
Essential Features Every Camerabewaking App Should Have
Not all camerabewaking apps are created equal. Here are the features that separate professional solutions from amateur ones:
Live Video Streaming & Multi-Camera Support
Any camerabewaking app worth using must deliver:
- HD/4K Quality: Minimum 1080p, with 4K options for critical areas
- Low Latency: Less than 2-second delay between camera and app
- Multi-Camera Dashboard: View 4, 9, or 16 cameras simultaneously
- Simultaneous Connections: Multiple family members/employees viewing at once
- Browser Access: Desktop viewing in addition to mobile
This allows effective monitoring across entire properties.
Motion Detection & Intelligent Alerts
The quality of motion detection directly impacts usability:
- AI-Powered Detection: Distinguishes people, vehicles, and animals from wind/shadows
- Adjustable Sensitivity: Fine-tune detection to match your environment
- Zone-Based Alerts: Create specific areas that trigger notifications
- Scheduled Detection: Only active during certain hours
- False Alert Reduction: Advanced algorithms minimize notifications from irrelevant motion
- Custom Alert Rules: “Alert only for people between 9 PM and 6 AM”
Poor motion detection leads to alert fatigue; good detection provides genuine peace of mind.
Video Recording & Playback Capabilities
Recording is the foundation of surveillance:
- 24/7 Continuous Recording: Always-on recording for comprehensive coverage
- Event-Based Recording: Record only when motion is detected (saves storage)
- High Bitrate Capture: Quality shouldn’t degrade in recorded footage
- Fast Playback Search: Quickly find footage by date/time or motion events
- Timeline View: Visual representation of detected events
- Export Capabilities: Download clips as MP4 for legal proceedings
Two-Way Audio Communication
This feature enhances security response:
- Noise Cancellation: Clear communication without background interference
- Intercom Function: Talk to people near the camera in real-time
- Auto-Response: Pre-recorded messages for deterrence
- Privacy Protection: Alerts recipients that they’re being monitored
Two-way audio has prevented countless break-ins simply by allowing homeowners to communicate with potential intruders.
Night Vision & Thermal Imaging
Quality camera technology is crucial:
- Infrared (IR) Night Vision: See in complete darkness up to 30+ feet
- Color Night Vision: Advanced models provide color footage even in darkness
- Thermal Imaging: Detect heat signatures through obstacles (fog, rain)
- Dynamic Range: Handle sudden lighting changes smoothly
- Low-Light Performance: Clear footage in low but not completely dark conditions
Night vision capability is non-negotiable for security; most crimes occur after dark.
Cloud Storage & Local Recording Options
As discussed earlier, offering both options is essential:
- Flexible Storage Models: Choose cloud, local, or hybrid
- Storage Plans: Options ranging from 7 days to 365+ days of retention
- Automatic Deletion: Old footage automatically purged based on retention policy
- Custom Retention: Different retention for different cameras or events
- Backup Systems: Multiple redundancy ensures footage isn’t lost
Mobile App Optimization
The app itself matters as much as the camera:
- Fast Load Times: Video appears within 1-2 seconds
- Intuitive Interface: New users can navigate without training
- Offline Access: Limited functionality without internet
- Push Notifications: Timely, detailed alerts
- Biometric Security: Fingerprint/face recognition for app access
- Battery Optimization: Doesn’t drain phone battery during monitoring
Advanced Analytics & AI Features
Cutting-edge camerabewaking apps now offer:
- Person/Vehicle Recognition: Identify specific individuals (family members vs. strangers)
- Behavioral Analysis: Detect loitering, object removal, crossing boundaries
- Heat Maps: Visual representation of activity patterns
- Time-Lapse Summaries: Automated daily/weekly video summaries
- Predictive Alerts: Machine learning that anticipates security threats
- License Plate Recognition: Identify vehicles for commercial/law enforcement use
These advanced features are becoming standard in professional camerabewaking systems.
Setting Up Your Camerabewaking System: Step-by-Step Guide
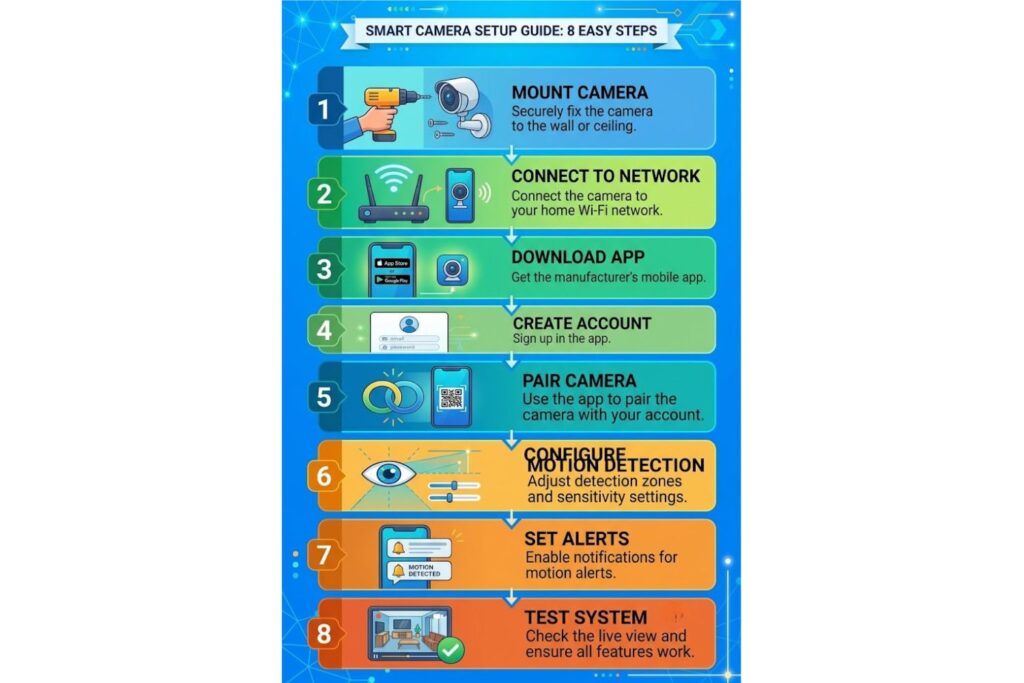
Ready to implement a camerabewaking system? Here’s exactly how to do it:
Step 1: Determine Your Hardware Requirements & Compatibility
Before purchasing anything, assess your needs:
Questions to Answer:
- How many cameras do you need? (home = 1-4, business = 4-16+)
- What areas do you need to cover? (entrances, perimeter, interior)
- Do you have existing cameras to integrate?
- What’s your budget? ($200-500 for basic, $2,000+ for professional)
- Do you need indoor, outdoor, or both?
- What environmental conditions? (dust, extreme heat, moisture)
- Do you require Pan-Tilt-Zoom (PTZ) capabilities?
Compatibility Check:
- Verify your network can handle video streaming (minimum 2-4 Mbps per camera)
- Check WiFi coverage in areas where you want cameras
- Confirm power availability (wall outlets, power over Ethernet options)
- Research which camerabewaking app ecosystems fit your existing devices
Step 2: Install the Physical Camera Hardware
Optimal Camera Placement:
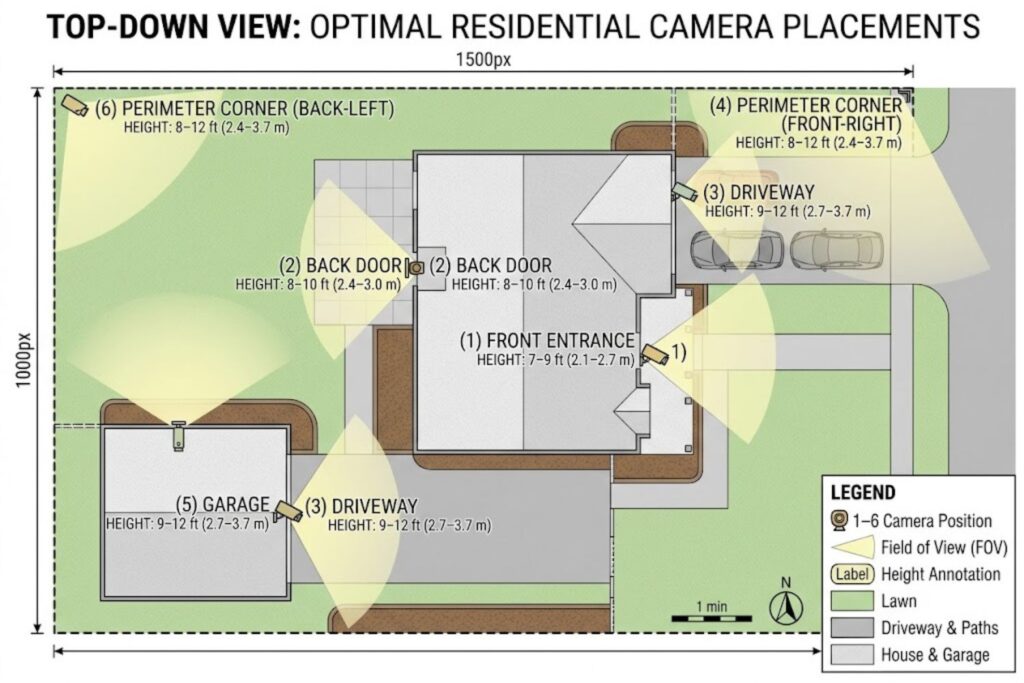
- Entrance doors (primary entry points)
- Driveway/parking areas (vehicle protection)
- Perimeter of property (8-12 feet height ideal)
- Back doors and windows
- Interior common areas
Installation Best Practices:
- Mount cameras 8-12 feet high (harder to disable, better field of view)
- Position to avoid direct sunlight in video feed
- Ensure backup power options (battery or UPS)
- Use weatherproof connectors and UV-resistant cables
- Avoid pointing directly at reflective surfaces
Step 3: Configure Your Network
This is where many installations fail:
WiFi Setup:
- Position router for maximum camera coverage
- Use 5GHz band if available (less interference, faster speeds)
- Set strong WiFi password (no default credentials)
- Enable WPA3 encryption (or at least WPA2)
- Position cameras within strong signal areas (test with phone first)
Wired Setup (Preferred for Professional):
- Run Ethernet cables from network switch to cameras
- Use CAT6 or higher rated cable for best performance
- Install separate PoE (Power over Ethernet) injector if needed
- Label all connections for future troubleshooting
Network Optimization:
- Allocate sufficient bandwidth (2-4 Mbps per camera minimum)
- Separate camera traffic on dedicated network if possible
- Configure QoS (Quality of Service) rules to prioritize camera traffic
- Test actual speeds with devices present
Step 4: Download & Install the Camerabewaking App
- Download from official App Store (iOS) or Google Play (Android)
- Verify publisher is legitimate (check reviews, ratings)
- Update to latest version immediately
- Create strong account credentials
- Enable two-factor authentication
Step 5: Perform Initial App Setup & Camera Pairing
Most apps guide you through this:
- Create account and verify email
- Select “Add Camera” or “Add Device”
- Scan QR code on camera or enter serial number
- Select your WiFi network and enter password
- App communicates with camera
- Camera receives WiFi credentials and connects
- Live video appears in app (wait 30-60 seconds)
Troubleshooting If Video Doesn’t Appear:
- Verify camera has power and network connection
- Check WiFi signal strength in camera location
- Restart camera (power cycle for 30 seconds)
- Restart router and mobile device
- Check app permissions (camera, location, notifications)
- Verify firewall isn’t blocking camera app
Step 6: Configure Motion Detection Rules
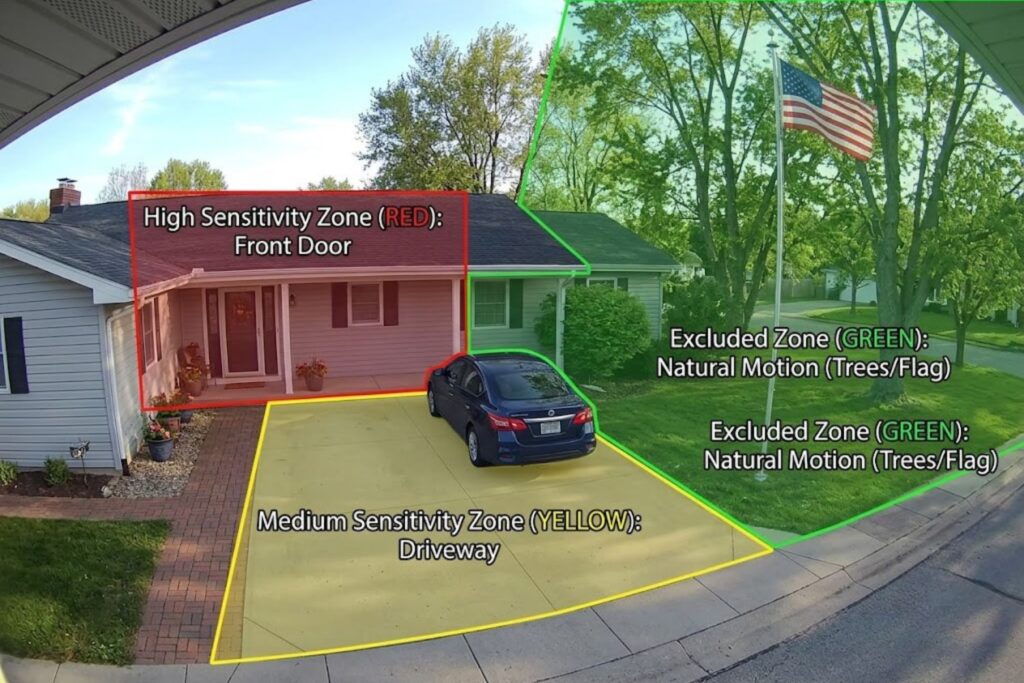
This determines how sensitive your alerts are:
- Go to camera settings → Motion Detection
- Set detection sensitivity (usually 1-10 scale)
- Select detection zone (area where motion matters)
- Adjust detection schedules (24/7, nights only, away mode, etc.)
- Set re-trigger interval (minimum time between consecutive alerts)
- Enable/disable specific alert types (push, SMS, email)
Pro Tips:
- Start with higher sensitivity, then dial back if false alerts occur
- Create different profiles for day/night (cameras see differently in darkness)
- Use zones to ignore areas that move naturally (trees, flags)
- Test by walking through detection zone
Step 7: Configure Alert Preferences & Notification Settings
Alerts should be helpful, not annoying:
- Go to app settings → Notifications
- Choose alert types (push, SMS, email, in-app only)
- Set notification priority (high, medium, low)
- Enable/disable for specific cameras
- Set quiet hours (e.g., no alerts between 11 PM – 7 AM)
- Configure alert details (brief, detailed, video clip)
- Test by triggering motion in camera view
Best Practice: Most users prefer 2-3 alert types maximum; too many become noise.
Step 8: Test Live Streaming Quality & Settings
Before relying on your system:
- Open live view on phone at different locations
- Test on WiFi and cellular (4G/5G) connections
- Verify video loads within 2 seconds
- Check video clarity and frame rate
- Test zoom and pan features
- Verify two-way audio (if available)
- Test recording and playback
- Confirm cloud storage is working
- Check that footage appears in app
- Try accessing from different devices
Quality Benchmarks:
- Live video: Should appear within 1-2 seconds
- Video clarity: Should show faces clearly at 10+ feet distance
- Frame rate: Minimum 15 FPS; 30 FPS preferred
- Audio: Should be clear with minimal echo
- Storage: Should confirm recordings are being saved
Camerabewaking App: NVR vs. VMS – Which Should You Choose?
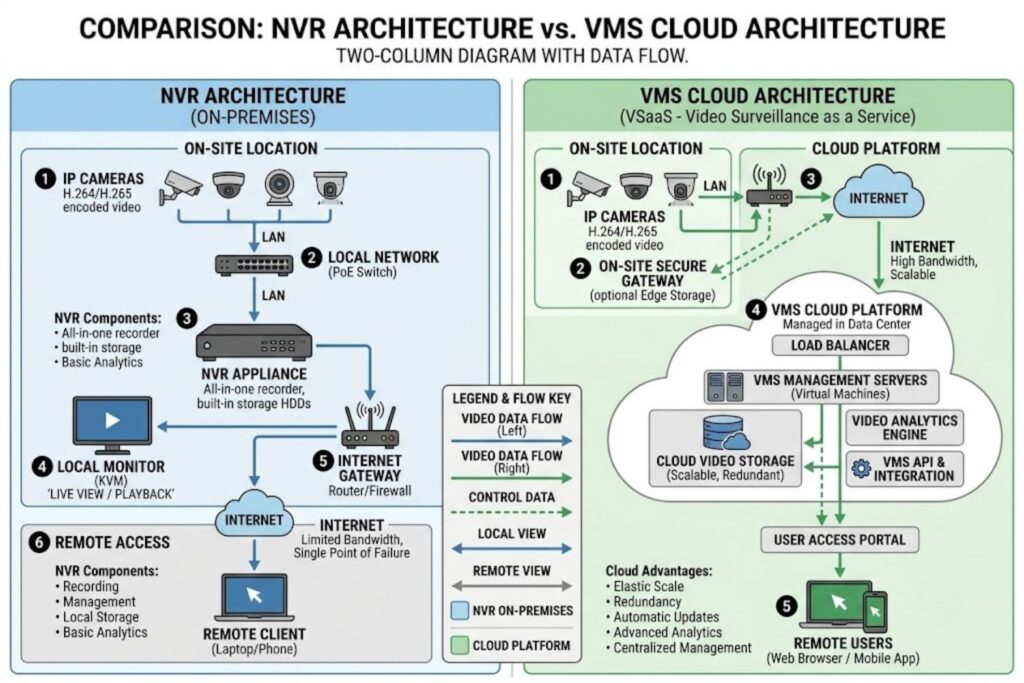
This is one of the most important decisions in setting up a camerabewaking system. Both options work with camerabewaking apps, but they function quite differently.
What is an NVR? (Network Video Recorder)
An NVR is a dedicated hardware device that sits on your local network and performs three core functions:
- Receives video from IP cameras connected to your network
- Records footage to internal hard drives
- Provides access via web interface or mobile app
Think of an NVR as a specialized computer designed specifically for video surveillance.
How an NVR Works with Camerabewaking Apps:
- Cameras stream to NVR on local network
- Mobile app communicates with NVR (usually through remote access)
- Footage is stored locally on NVR hard drives
- Cloud backup is optional
NVR Advantages:
- ✓ No ongoing subscription costs
- ✓ Data stays on your property (privacy)
- ✓ Fast local access to footage
- ✓ Works without internet (local monitoring only)
- ✓ Supports unlimited cameras (based on hard drive space)
- ✓ Professional-grade performance and reliability
NVR Disadvantages:
- ✗ Higher upfront hardware cost ($400-2,000+)
- ✗ Requires local network setup expertise
- ✗ Manual hard drive management and replacement
- ✗ Limited remote access features compared to VMS
- ✗ No automatic cloud backup without extra setup
What is a VMS? (Video Management System)
A VMS is cloud-based surveillance management software. Instead of local hardware, your footage is recorded to remote servers.
How a VMS Works:
- Cameras stream directly to cloud servers
- Mobile app accesses footage from cloud
- Storage managed automatically by cloud provider
- Accessible from anywhere with internet
VMS Advantages:
- ✓ No expensive hardware to purchase
- ✓ Automatic cloud backups (footage safe if camera is destroyed)
- ✓ Accessible from anywhere via mobile app
- ✓ Automatic software updates
- ✓ Scalable (add cameras anytime)
- ✓ Professional AI analytics included
VMS Disadvantages:
- ✗ Monthly subscription costs ($5-50 per camera)
- ✗ Footage stored on third-party servers (privacy concerns)
- ✗ Requires consistent internet connectivity
- ✗ Cloud data breaches could expose footage
- ✗ Long-term costs can exceed NVR investments
- ✗ Dependent on cloud provider uptime
Comparison Table: NVR vs. VMS
| Feature | NVR | VMS |
|---|---|---|
| Initial Cost | $400-2,000 | $0-100 |
| Monthly Cost | $0-20 (optional cloud) | $5-50/camera |
| 5-Year Cost | $400-2,500 | $3,000-30,000 |
| Installation | Moderate (networking) | Easy (download app) |
| Storage Capacity | Limited by HDD | Unlimited (cloud) |
| Remote Access | Limited | Full |
| Data Privacy | High (local storage) | Lower (cloud) |
| Uptime Dependency | Internet optional | Internet required |
| AI Features | Limited, optional | Usually included |
| Scalability | Good | Excellent |
| Footage Backup | Manual or optional | Automatic |
| Technical Support | Self-managed | Provider support |
Decision Framework: Choosing the Right System
Choose NVR If:
- You own the property and want complete control
- Privacy is your top concern
- You want to avoid recurring monthly costs
- You have technical skills or can hire installers
- You need local network access without internet
- You have large video archives (years of footage)
Choose VMS If:
- You rent your property (no permission for hardware)
- You want simple, plug-and-play setup
- You value automatic backups and redundancy
- You need access from multiple locations/devices
- You want built-in AI features and analytics
- You prefer managed service (no maintenance)
Choose Hybrid If:
- You want best of both worlds
- You have large, critical property
- Budget allows for dual approach
- You need both local speed and cloud backup
Top Camerabewaking App Solutions & Alternatives
Professional Enterprise Solutions
Milestone VMS (XProtect)
- Industry standard for large deployments
- Enterprise-grade security and compliance
- Thousands of integrations
- Price: $1,000-10,000+ depending on scale
- Best for: Large facilities, government, financial institutions
Genetec Omnicast
- Cloud and on-premise hybrid platform
- Advanced video analytics
- Professional support and training
- Price: $500-5,000+ for enterprise
- Best for: Transportation, retail, government
Axis Companion (Home/Small Business)
- Simplified version of enterprise systems
- Easy setup for non-technical users
- Good integration with Axis cameras
- Price: Free software, hardware costs
- Best for: Small businesses, premium residential
Mid-Market Options
NX Witness by Network Optix
- Professional VMS with cloud option
- Customizable interface
- Good camera compatibility
- Price: $0-500 depending on features
- Best for: Mid-size businesses, integrators
Dahua DMSS
- Cloud-based platform
- Supports Dahua and third-party cameras
- Mobile app included
- Price: $200-2,000+ depending on cameras
- Best for: Dahua ecosystem users, small to mid-size operations
Uniview iVMS
- VMS with mobile app
- Cloud and local recording options
- Supports 64+ cameras
- Price: Free software, hardware costs
- Best for: Uniview camera users, budget-conscious deployments
Budget-Friendly Alternatives
Blue Iris
- Popular Windows-based NVR software
- Supports 64+ cameras
- Strong mobile app
- Price: $70 one-time purchase
- Best for: DIY enthusiasts, budget-conscious homeowners
Zoneminder
- Open-source surveillance software
- Completely free
- Requires technical setup
- Price: Free
- Best for: Linux users, tech experts, no-budget installations
Smartphone-to-Camera Conversions
WardenCam
- Turn old smartphones into cameras
- Free to use with all features
- Motion detection and recording
- Best for: Budget monitoring, emergency cameras
Security Camera CZ
- Similar concept to WardenCam
- 6+ years in market
- Free with optional cloud
- Best for: Repurposing old phones, temporary monitoring
Security & Privacy Considerations: Critical
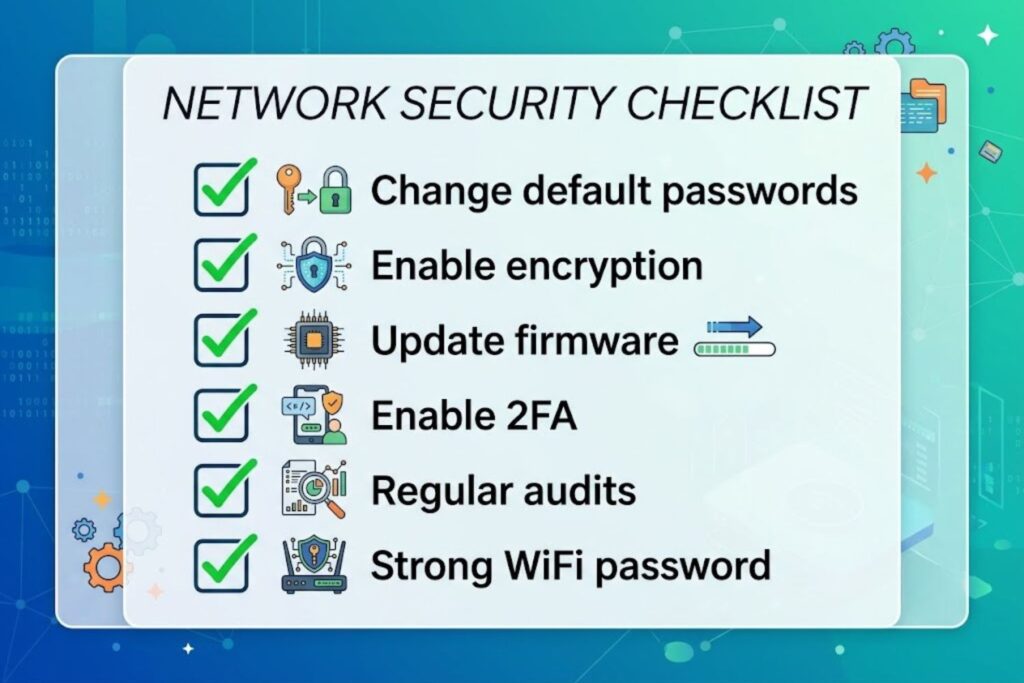
This section is often overlooked, but it’s absolutely critical. Insecure camerabewaking systems can become security vulnerabilities rather than solutions.
Encryption Standards for Camerabewaking Apps
Transport Layer Security (TLS/SSL):
- All data traveling between camera and app should be encrypted
- Look for HTTPS connections (padlock icon in browser)
- Minimum: TLS 1.2; Better: TLS 1.3
- What it prevents: Interception of passwords, video feeds, alert notifications
End-to-End Encryption (E2E):
- Video encrypted on camera, decrypted only in your app
- Provider cannot see your footage even if they wanted to
- Industry leaders: Signal, WhatsApp use this
- What it prevents: Even cloud provider employees can’t access your footage
AES Encryption:
- Standard used for video file encryption
- AES-256 is military-grade and considered unbreakable
- What it prevents: Thieves accessing stored footage from stolen hard drives
Verification Checklist:
- ✓ App uses HTTPS for all connections
- ✓ Camera-to-app connection is encrypted
- ✓ Cloud storage encryption is AES-256 or better
- ✓ Password sent to server is never stored in plaintext
- ✓ Privacy policy mentions encryption standards explicitly
Data Privacy & Storage Compliance
Where Is Your Data Stored?
- Domestic servers (USA-based) = More privacy protection
- International servers = GDPR compliance required
- Unknown location = Red flag
Data Retention Policies:
- Video stored forever = Privacy concern
- Video auto-deleted after 30 days = Good practice
- Customizable retention = User control (better)
Compliance Standards:
- GDPR (Europe): Strict consent and data handling rules
- CCPA (California): Right to delete personal data
- HIPAA (Healthcare): Protected health information requirements
- FedRAMP (Government): Federal systems certification
Questions to Ask Provider:
- Where is footage stored geographically?
- How long is footage retained?
- Can I delete my data on demand?
- Is encryption employed?
- Have they been audited by third parties?
- What is their privacy policy?
Authentication & Access Control
Multi-Factor Authentication (MFA):
- Essential: Something you know (password) + something you have (phone)
- Prevents account takeover even if password is compromised
- Industry standard: TOTP (Time-based One-Time Password) apps
Biometric Security:
- Fingerprint or face recognition for app login
- Second layer of security for sensitive monitoring
- Increasingly common in modern apps
Role-Based Access Control:
- Different users have different permission levels
- Admin: Full access
- Monitoring: View-only access
- Guest: Limited temporary access
- Prevents employees from accessing cameras they shouldn’t see
Session Management:
- Auto-logout after period of inactivity (5-30 minutes recommended)
- Prevents unauthorized access if device is left unattended
- Option to manually logout all sessions
Audit Logs:
- Who accessed what footage, when, and from where
- Critical for compliance and incident investigation
- Should be stored separately from main system
Protecting Against Unauthorized Access
Camera Firmware Updates:
- Regularly update camera firmware to patch security vulnerabilities
- Set automatic updates if available
- Never skip security updates, even if inconvenient
Default Credentials:
- Change all default usernames/passwords on cameras
- Use strong, unique passwords (12+ characters, mixed case, numbers, symbols)
- Never use same password as email or other accounts
Network Segmentation:
- Separate cameras on isolated network if possible
- Restricts hacker access if one device is compromised
- Advanced: Use VPN for remote access (harder to intercept)
Regular Security Audits:
- Test camera access from different networks monthly
- Check for suspicious login activity
- Review access logs quarterly
- Update passwords every 90 days
Disabling Unnecessary Features:
- Disable remote access if not needed
- Turn off P2P (peer-to-peer) features if not using them
- Disable UPnP (Universal Plug and Play) on router
- Minimize attack surface
GDPR & Regional Compliance
If you operate in Europe or monitor EU residents:
Key GDPR Requirements:
- Inform people they’re being monitored (visible camera signs)
- Only record what’s necessary (not all public areas)
- Retain footage only as long as needed
- Document your legal basis for monitoring
- Provide data subject access upon request
- Notify authorities of data breaches within 72 hours
Implementation for Camerabewaking:
- Post “CCTV in operation” signs clearly visible
- Keep retention periods short (30 days maximum if possible)
- Store in EU-based servers (not US-based for EU data)
- Have privacy policy explaining monitoring
- Implement data deletion request process
Common Mistakes When Using Camerabewaking Apps
Even with good technology, poor implementation wastes money and compromises security. Here are the most common mistakes:
Mistake 1: Poor WiFi Configuration
The Problem: Weak WiFi signal causes constant disconnections, buffering, and alert delays.
Why It Happens: Cameras placed too far from router; WiFi congested with too many devices; wrong frequency band selected.
The Solution:
- Test WiFi strength before mounting cameras (-70 dBm or stronger)
- Use 5GHz for cameras if available (less interference)
- Add WiFi mesh network if coverage is poor
- Move router to central location
- Consider wired Ethernet for critical cameras
Mistake 2: Inadequate Storage Planning
The Problem: Storage fills up; oldest footage deletes; just when you need 60-day-old footage, it’s gone.
Why It Happens: Underestimating storage needs; not calculating retention periods; ignoring cloud subscription limitations.
The Solution:
- Calculate required storage: (bitrate in Mbps) × (3600 seconds/hour) × (24 hours) × (days retained) ÷ 8 ÷ 1,000 = GB per day
- Example: 4 Mbps camera recording 30 days = 129 GB storage
- Plan for 1.5x calculated storage (buffer for peaks)
- Test how long footage actually lasts with your cameras
- Set automatic deletion policies (avoid manual management)
Mistake 3: Ignoring Security Settings
The Problem: Hacker gains access to your camera system; footage is exposed; criminals study your property for burglary.
Why It Happens: Default passwords; no encryption enabled; neglected firmware updates; weak WiFi password.
The Solution:
- Change all default passwords immediately
- Enable encryption (TLS/SSL minimum)
- Update firmware when available
- Use strong WiFi password (WPA3 or WPA2)
- Enable two-factor authentication
- Regularly audit access logs
Mistake 4: Failing to Test Regularly
The Problem: System fails when you need it most; discovered during incident investigation, not proactively.
Why It Happens: “Set it and forget it” mentality; lack of maintenance schedule; assuming system still works.
The Solution:
- Test cameras monthly (walk through field of view)
- Check storage status weekly
- Verify cloud recordings are saving
- Test alert notifications
- Check app performance on different networks
- Review footage weekly to catch quality issues
- Create maintenance checklist and follow it
Mistake 5: Incorrect Alert Configuration
The Problem: Alerts either stop working (missed incidents) or become so frequent you ignore them (alert fatigue).
Why It Happens: Sensitivity set too high or too low; no scheduling; no zones defined; alerts sent to wrong number/email.
The Solution:
- Start with moderate sensitivity, adjust based on results
- Create detection zones (don’t alert on irrelevant areas)
- Use scheduling (stricter at night, lenient during day)
- Enable AI-powered filtering (people vs. animals vs. objects)
- Test with deliberate motion to confirm working
- Set realistic re-trigger intervals (avoid repeated alerts)
- Verify contact information is correct and monitored
Camerabewaking App vs. Alternatives: Complete Comparison
How does camerabewaking compare to other security camera options? Here’s an honest assessment.
Camerabewaking vs. Ring/Nest Video Doorbells
Ring Video Doorbell:
- Pros: Extremely easy setup, brand recognition, integrates with Amazon ecosystem, two-way audio
- Cons: Limited field of view (doorbell area only), subscription required for cloud recording, battery drain
- Best for: Basic doorway monitoring, smart home enthusiasts
- Cost: $100-200 device + $100/year subscription
Camerabewaking vs. Ring:
- Camerabewaking: Better for whole-property coverage, more flexible placement, works with existing cameras
- Ring: Better for ease of use, brand integration, specifically optimized for doorways
Camerabewaking vs. Standalone Security Camera Apps
Many companies (Wyze, Arlo, Blink) offer proprietary apps for their cameras.
Wyze Cam:
- Pros: Very affordable ($25-60 per camera), excellent value, free basic app
- Cons: Cloud storage requires subscription, Chinese company (privacy concerns for some), limited advanced features
- Best for: Budget-conscious homeowners, renters
- Cost: $25-60 per camera + optional $1-2/month storage
Camerabewaking vs. Wyze:
- Camerabewaking: More customizable, works with multiple brands, enterprise-ready
- Wyze: Simpler, more affordable, better for basic monitoring
Camerabewaking vs. Professional CCTV Systems
Traditional Professional CCTV:
- Pros: Established technology, professional installation available, no internet required (DVR-based), industrial reliability
- Cons: Expensive ($3,000-10,000), limited remote access, manual monitoring required, DVR/NVR needs local access
- Best for: Retail stores, warehouses, casinos requiring 24/7 monitoring
- Cost: $3,000-10,000+ installation + $0-500/month monitoring
Camerabewaking vs. Professional CCTV:
- Camerabewaking: Modern, cloud-enabled, remote monitoring, scalable, automated alerts
- Professional CCTV: Proven, high-reliability, works without internet, better for large-scale operations
Comparison Table: Feature Analysis
| Feature | Camerabewaking | Ring Doorbell | Wyze Cam | Professional CCTV |
|---|---|---|---|---|
| Ease of Setup | Medium | Very Easy | Very Easy | Hard |
| Initial Cost | $200-1,000 | $100-200 | $25-60 | $3,000+ |
| Monthly Cost | $0-50 | $5-15 | $0-5 | $50-500 |
| Remote Access | Excellent | Good | Good | Limited |
| AI Features | Yes | Yes | Limited | No |
| Multiple Cameras | Supports 4-64+ | 1 (doorbell) | 1-8+ | 4-64+ |
| Storage Options | Cloud/Local | Cloud only | Cloud only | Local only |
| Customization | High | Low | Medium | High |
| Professional Grade | Yes | No | No | Yes |
Best Practices for Optimal Camerabewaking Performance
To get the most from your system, follow these practices:
Regular Maintenance & Updates
Monthly Tasks:
- Check camera for dust/debris, clean lens gently
- Verify live streaming is working
- Review storage usage
- Test motion detection
Quarterly Tasks:
- Check for firmware updates
- Review and optimize motion detection zones
- Test recording playback
- Update password
Annually:
- Full system audit
- Replace any worn components
- Review and update security settings
- Evaluate system performance and upgrade if needed
Bandwidth & Network Optimization
Optimize Router Settings:
- Position router centrally
- Use 5GHz band for cameras (less interference)
- Enable QoS to prioritize camera traffic
- Set channel width to 40MHz or 80MHz
- Reduce congestion by disconnecting unused devices
Monitor Bandwidth Usage:
- Each camera uses 2-4 Mbps for HD streaming
- Plan for peak usage (multiple simultaneous streams)
- Use ISP bandwidth monitoring tools
- Upgrade internet if frequently bottlenecked
Network Security:
- Hide SSID broadcast (minor deterrent)
- Enable WPA3 encryption (or at least WPA2)
- Set strong WiFi password
- Disable WPS (WiFi Protected Setup)
Storage Management Strategies
Optimize Cloud Storage:
- Choose variable bitrate (VBR) encoding to save space
- Enable event-based recording when motion-detection is reliable
- Set automatic deletion after 30-60 days (adjust as needed)
- Archive important footage to separate storage
- Monitor remaining storage monthly
Optimize Local Storage:
- Use RAID 1 or RAID 5 for redundancy
- Monitor hard drive health with SMART monitoring
- Replace aging drives before failure
- Keep 20% free space for optimal performance
- Test backup recovery process
Scheduling & Automation Tips
Create Smart Schedules:
- Full 24/7 recording when property is empty
- “Away mode” with higher alert sensitivity
- “Home mode” with reduced motion detection
- “Sleeping mode” during night with restricted zones
- “Work mode” for business hours
Automation Examples:
- Automatically switch to “Away mode” at 9 AM on weekdays
- Switch to “Home mode” at 6 PM weekdays
- Activate “Sleeping mode” at 11 PM
- Increase alert sensitivity when last person leaves
- Send weekly digest of recorded events
Integration with Smart Home Systems
Popular Integrations:
- Apple HomeKit: View live footage on Apple TV, control with Siri
- Amazon Alexa: Voice commands to check cameras
- Google Assistant: Similar voice control integration
- IFTTT: Create complex automation rules
- Smartthings: Samsung ecosystem integration
Workflow Examples:
- “If motion detected at front door, turn on porch lights”
- “If door opens while away, send notification and record 10-minute video”
- “Ask Alexa to show living room camera on Echo Show”
- “Create daily timelapse at sunset”
Cost Breakdown: Understanding Camerabewaking App Pricing
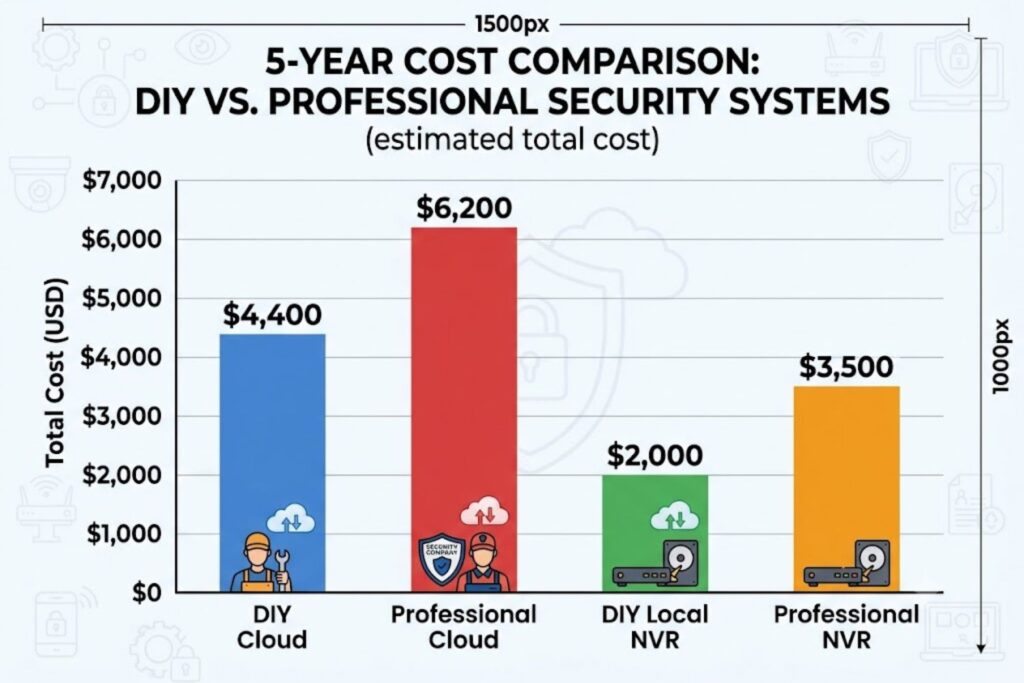
Let’s be transparent about total cost of ownership:
Hardware Costs
Entry-Level Setup (1-2 cameras):
- Cameras: $100-300
- WiFi equipment: $0-100 (if upgrading router)
- Cables/mounts: $20-50
- Total: $120-450
Mid-Range Setup (4 cameras):
- Cameras: $400-1,000
- NVR/NAS: $300-800 (optional)
- WiFi equipment: $50-200
- Cables/mounts: $50-100
- Total: $800-2,100
Professional Setup (8+ cameras):
- Cameras: $1,200-3,000
- NVR/NAS: $800-2,000
- Professional installation: $1,000-3,000
- Networking equipment: $200-500
- Cables/infrastructure: $200-500
- Total: $3,400-9,000+
Subscription & Cloud Storage Pricing
Cloud-Based Systems:
- Entry plan: $5-15/month per camera
- Mid-tier: $15-30/month per camera
- Professional: $30-100+/month per camera
- Example: 4 cameras at $15/month = $60/month = $720/year
Local Storage (NVR/NAS):
- One-time cost: $400-2,000
- Replacement hard drives: $50-200 every 3-5 years
- No ongoing subscription fees
Professional Installation (Optional)
DIY Setup: $0 (but requires technical knowledge)
Professional Installation:
- Basic (2-4 cameras): $400-800
- Mid-size (4-8 cameras): $800-1,600
- Large (8+ cameras): $1,600-5,000+
When to hire professionals:
- Lack technical skills or confidence
- Complex network requirements
- Outdoor installation (heights, running cables)
- Custom integrations needed
ROI & Long-Term Value
5-Year Cost Comparison:
Cloud-Based VMS (4 cameras, $15/month each):
- Hardware: $800
- Subscriptions: $60 × 12 × 5 = $3,600
- Total: $4,400
Local NVR System (4 cameras):
- Hardware: $1,500
- Drive replacement (year 3): $200
- Electricity (5 years): $300
- Total: $2,000
Savings with NVR: $2,400 (54% less expensive)
Intangible Benefits (Both Systems):
- Peace of mind: Priceless
- Insurance discounts: $10-50/month possible
- Incident documentation: Critical for legal/police
- Crime prevention: Visible cameras deter criminals
- Property value: Security systems appeal to buyers
Camerabewaking App for Different Use Cases
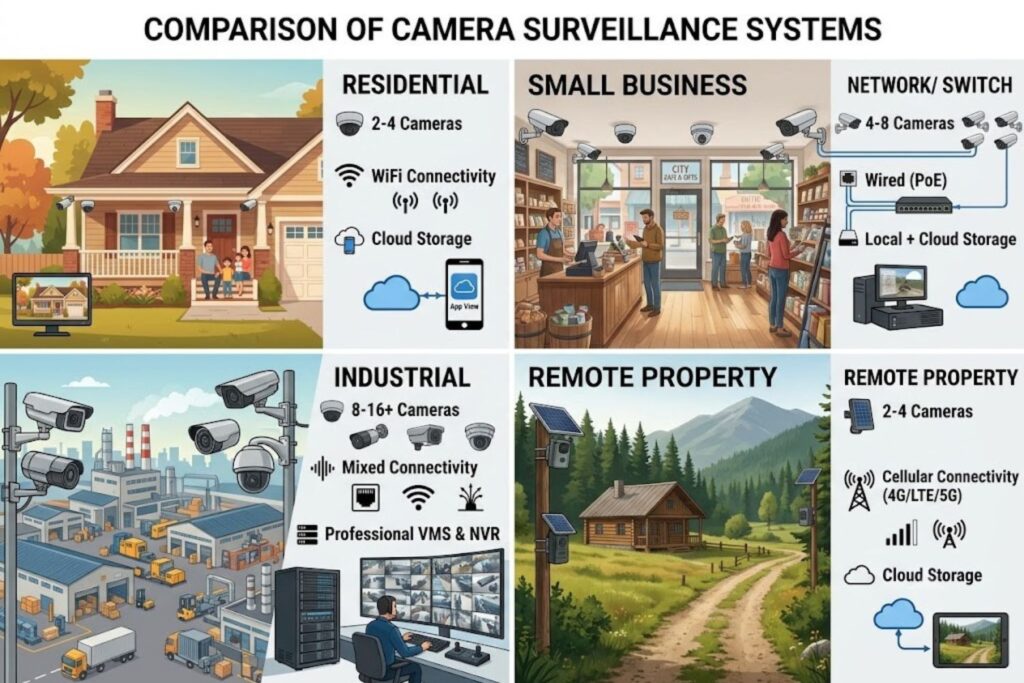
Camerabewaking isn’t one-size-fits-all. Different scenarios require different approaches:
Home Security & Residential Monitoring
Typical Setup:
- 2-4 cameras (entrances, back door, garage, driveway)
- WiFi-based connectivity
- Cloud storage 30-60 days
- Motion detection for alerts
- Two-way audio for intercom
Recommended Features:
- Night vision (essential for outdoor cameras)
- Two-way audio (communicate with family/guests)
- Person detection (reduce false alerts from animals)
- Remote access (check on pets, kids)
- Scheduling (adjust alerts based on occupancy)
Budget: $500-1,500 initial + $0-300/year
Small Business & Retail Surveillance
Typical Setup:
- 4-8 cameras (entrance, checkout, storage, parking)
- Wired Ethernet connectivity (more reliable)
- Local NVR + cloud backup
- 30-90 day retention (compliance)
- Continuous 24/7 recording
Recommended Features:
- People counting (track traffic)
- Heat maps (understand customer flow)
- License plate recognition (parking/lot management)
- Multi-user access (manager, staff roles)
- Integration with alarm systems
- Professional support available
Budget: $2,000-5,000 initial + $0-500/year
Industrial & Facility Monitoring
Typical Setup:
- 8-16+ cameras (perimeter, gates, production areas)
- Mixed WiFi and wired connectivity
- On-premise storage (proprietary systems)
- 90-180 day retention
- Zone-based alerting
Recommended Features:
- High-resolution 4K cameras (license plates, details)
- Environmental sensors (temperature, motion, intrusion)
- Integration with access control
- Advanced analytics and reports
- Failover systems (redundancy)
- 24/7 professional monitoring available
Budget: $5,000-15,000+ initial + $1,000-5,000/year
Remote Property Management
Typical Setup:
- 2-4 cameras (vacation home, rental property)
- Cellular backup (unreliable WiFi in remote areas)
- Cloud storage only (no on-site hardware)
- Event-triggered recording (save storage)
- Mobile app primary access
Recommended Features:
- Low-bandwidth operation (works on 4G)
- Cloud storage with automatic backup
- Push notifications for motion/intrusion
- Two-way audio (communicate with guests)
- Tamper detection (alert if camera is disabled)
- Guest access (temporary view-only for renters)
Budget: $300-1,000 initial + $100-300/year
Pet & Elder Care Monitoring
Typical Setup:
- 1-2 indoor cameras (living room, bedroom)
- WiFi connectivity
- Cloud storage 7-14 days (privacy)
- Sound detection (crying, distress)
- Two-way audio for communication
Recommended Features:
- High nighttime clarity (dark rooms)
- Motion detection customized for pets/people
- Sound/crying alerts (for infants)
- Wide field of view (see entire room)
- Easy interface (quick access)
- Privacy-first settings (limited storage)
Budget: $200-600 initial + $50-150/year
The Future of Camerabewaking Technology
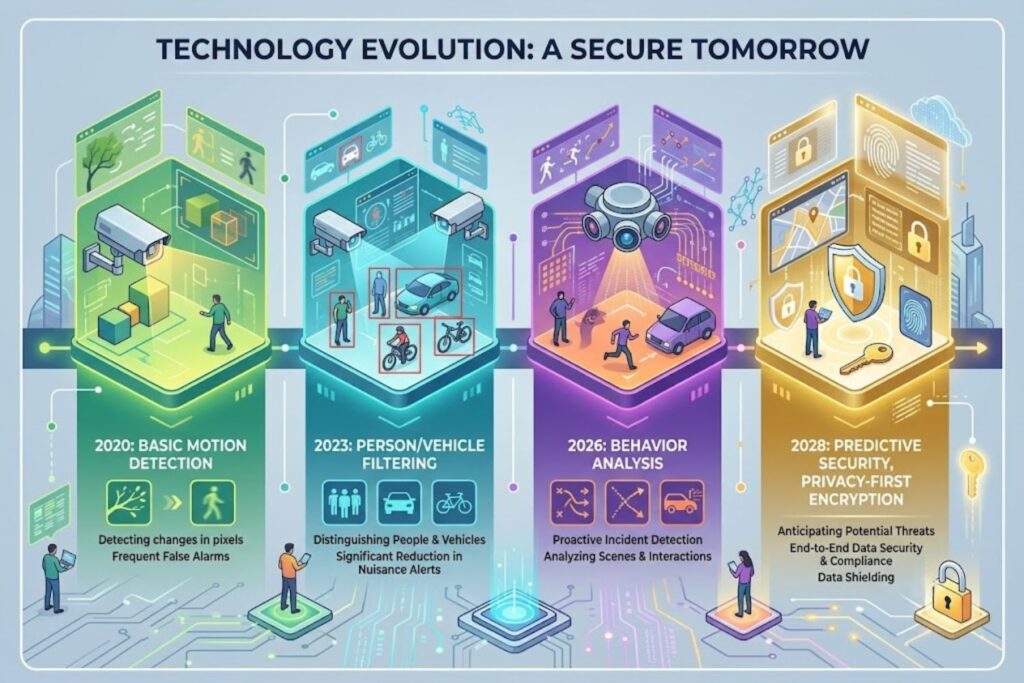
Camerabewaking is evolving rapidly. Here’s what’s coming:
AI & Machine Learning Integration
Current State (2026):
- Basic motion detection with person/vehicle filtering
- Rudimentary behavior analysis
Near Future (2027-2029):
- Advanced behavior analysis (detecting falls, violence, loitering)
- Facial recognition with privacy controls
- Automatic incident categorization (theft, accident, medical event)
- Predictive security (alerts before incidents occur)
Example: Camera detecting elderly person fall and automatically alerting medical services.
5G Connectivity Improvements
Impact:
- Ultra-low latency (under 10ms) enables real-time control
- Higher bandwidth for 4K/8K video streaming
- More reliable cellular backup options
- IoT integration (every device is connected)
Example: 5G enables professional-grade remote monitoring with cellular cameras only.
Advanced Analytics & Insights
Coming Features:
- Heat mapping (understand movement patterns)
- Crowd analysis (detect gatherings, protests)
- Behavior profiling (identify suspicious patterns)
- Object detection (track valuable items)
- Anomaly detection (detect unusual activities)
Example: Retail store manager sees heat map showing customers avoid certain areas, enabling store optimization.
Privacy-First Cloud Solutions
Evolution:
- On-device processing (video analyzed locally, not sent to cloud)
- Encrypted end-to-end solutions becoming standard
- Regulatory compliance built-in (GDPR, CCPA automatic)
- User ownership of data (not provider ownership)
Example: Video analyzed on camera itself; only alerts sent to cloud, never raw footage.
Key Takeaways: Camerabewaking App Essentials
Before we move to FAQs, here’s what you absolutely need to know:
- Camerabewaking apps enable remote camera monitoring from anywhere via mobile or desktop
- Two storage models exist: Cloud (subscription, convenience) and Local/NVR (cost-effective, private)
- Setup requires attention to: Network configuration, security settings, and storage planning
- Security is non-negotiable: Encryption, strong passwords, firmware updates, and multi-factor authentication are essential
- Cost varies dramatically: From $300 for basic home system to $10,000+ for professional setups
- Mistakes compound: Poor WiFi, bad alert configuration, and neglected updates become expensive problems
- AI features are differentiators: Modern apps offer intelligent filtering reducing false alerts
- Privacy compliance matters: GDPR, CCPA, and regional laws apply to surveillance systems
- Integration matters: Modern systems work with smart home ecosystems, access control, and alarm systems
- Test regularly: Monthly testing prevents “system down” surprises when you need it most
FAQ: Camerabewaking Apps Answered
1. What is the difference between a camerabewaking app and a CCTV app?
Answer: Camerabewaking refers to modern IP-based camera surveillance systems with cloud/app access, while traditional CCTV uses analog cameras connected to DVRs with limited remote monitoring. Camerabewaking apps provide significantly better remote access, AI features, and cloud storage options.
2. How secure are camerabewaking apps?
Answer: Security depends on implementation. Good camerabewaking apps use AES-256 encryption, TLS/SSL for data transmission, and multi-factor authentication. However, weak passwords or outdated firmware can compromise security. Always change default credentials, enable encryption, and keep firmware updated.
3. Can I view camerabewaking footage if my internet is down?
Answer: Only if using local NVR storage without internet dependency. Cloud-based systems require internet. Hybrid systems (local storage + cloud backup) work offline locally but can’t access remote footage until connectivity returns.
4. How much storage do I need for camerabewaking cameras?
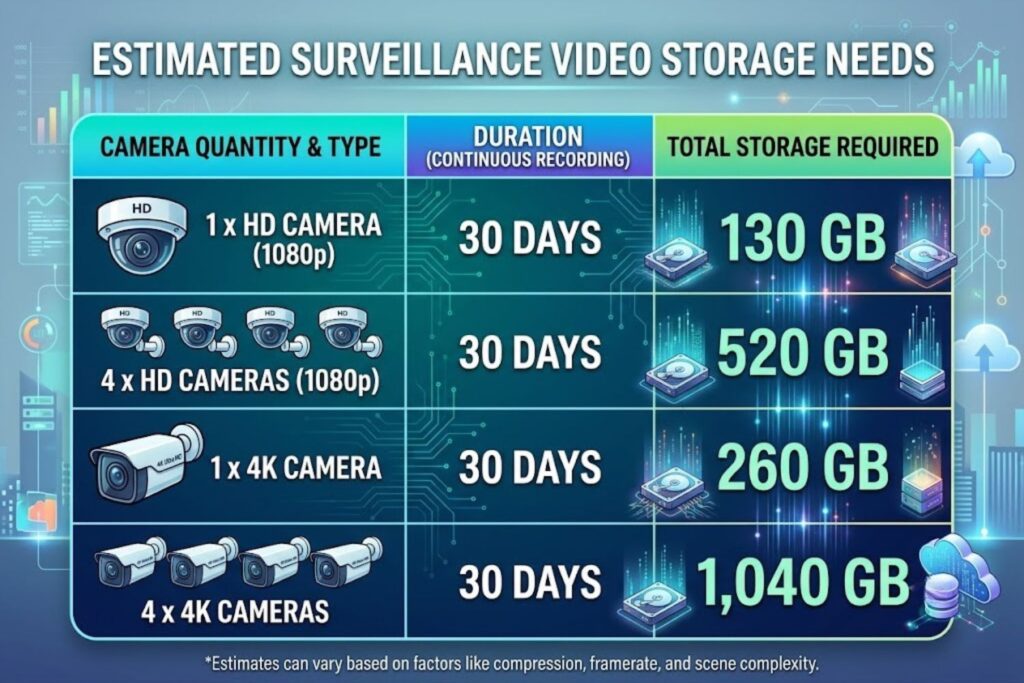
Answer: Depends on resolution, frame rate, and retention period. HD cameras need ~100-150 GB per month; 4K needs ~200-300 GB per month. Calculate based on: (bitrate Mbps) × (3,600 seconds/hour) × (24 hours) × (retention days) ÷ 8 ÷ 1,000 = GB per day.
5. Is camerabewaking app legal for home security?
Answer: Yes, in your own home. However, recording audio requires consent in some states (two-party consent states). Outdoor recording is generally legal. Check local laws for specific regulations on audio recording and employee monitoring if applicable.
6. How do I choose between camerabewaking app brands?
Answer: Evaluate: (1) Compatibility with existing cameras, (2) Cloud vs. local storage preference, (3) Budget (hardware + subscriptions), (4) Features needed (AI, two-way audio, etc.), (5) Customer reviews and support, (6) Privacy/security standards, (7) Integration capabilities.
7. Can I use camerabewaking app for pet monitoring?
Answer: Yes. Set cameras in areas where pets spend time, enable motion detection, configure high sensitivity for animal movement, use two-way audio to calm pets, and enable night vision for dark areas. Sound detection can alert you to distressed pets.
8. What happens to my footage if the camerabewaking app company goes out of business?
Answer: Cloud-based systems risk losing footage if company fails without warning. Protect yourself by: (1) Regularly exporting important footage, (2) Using hybrid systems with local backup, (3) Choosing established companies, (4) Checking privacy policy for data recovery procedures.
9. Can I integrate camerabewaking app with my smart home?
Answer: Many camerabewaking apps integrate with Apple HomeKit, Amazon Alexa, Google Assistant, or IFTTT. Check compatibility before purchasing. Integrations enable voice control, automation, and multi-platform access.
10. How do I reduce false alerts from camerabewaking app motion detection?
Answer: (1) Adjust sensitivity downward, (2) Create detection zones excluding areas that move naturally (trees, flags), (3) Enable person/vehicle filtering (AI-powered), (4) Increase re-trigger intervals, (5) Use scheduling (different rules day/night), (6) Test and refine settings iteratively.
11. Is camerabewaking app compliant with GDPR?
Answer: Compliance depends on implementation. GDPR-compliant systems: (1) Use EU-based servers, (2) Obtain consent before monitoring, (3) Display “CCTV in operation” signs, (4) Limit retention periods, (5) Provide data access on request, (6) Document legal basis for monitoring. Verify provider’s GDPR compliance.
12. Can I access camerabewaking footage for legal proceedings?
Answer: Yes. High-quality camerabewaking systems create admissible evidence if: (1) Clear video of incident, (2) Accurate timestamps, (3) Uninterrupted recording/storage, (4) Chain of custody documentation, (5) Proper export formats (MP4, MOV). Check local requirements for specific legal standards.
13. How often should I update camerabewaking app and firmware?
Answer: Enable automatic updates when possible. Manual updates should be checked: (1) Monthly for security patches, (2) Quarterly for feature updates, (3) Immediately for critical vulnerabilities. Never skip security updates; they patch potential breach pathways.
14. What’s the best camerabewaking app for businesses?
Answer: Best business options depend on scale: (1) Small business: Axis Companion or Dahua DMSS, (2) Mid-market: Genetec Omnicast or NX Witness, (3) Enterprise: Milestone XProtect or Uniview iVMS. Evaluate requirements, integrations, support, and budget.
15. Can I use camerabewaking app outdoors in extreme weather?
Answer: Yes, with proper cameras. Use weatherproof IP67/IP68-rated cameras designed for outdoor conditions. Features needed: (1) Wide temperature operating range (-20°C to 50°C+), (2) UV-resistant housing, (3) Sealed connectors, (4) Built-in heaters for cold climates, (5) Housing with ventilation to prevent condensation.
Final Verdict: Is a Camerabewaking App Right For You?
Signs You Should Deploy a Camerabewaking System
✓ You want remote monitoring of property (home, business, or both) ✓ You’ve experienced security concerns or break-ins ✓ You want automatic alerts instead of manual monitoring ✓ You need evidence documentation for incidents ✓ You’re interested in smart home integration ✓ You want peace of mind when away from property ✓ You need compliance monitoring (business, sensitive areas) ✓ You have rental properties requiring guest monitoring
Signs Camerabewaking May Not Be Right (For Now)
✗ You have extremely limited budget ($0 not an option) ✗ You don’t have stable internet connectivity ✗ You have severe privacy concerns (use local NVR only) ✗ You’re renting and landlord forbids installation ✗ Your property is very small (<500 sq ft, 1-2 areas only) ✗ You prefer completely passive monitoring (no automation) ✗ You lack technical skills and installation is prohibitive
Making Your Decision
Step 1: Determine your primary use case (home, business, remote property)
Step 2: Assess your budget (initial hardware + annual costs)
Step 3: Choose storage preference (cloud, local, hybrid)
Step 4: Evaluate must-have features (2-way audio, AI, integrations)
Step 5: Research and compare 2-3 systems in your budget range
Step 6: Start small (1-2 cameras) to test before full deployment
Step 7: Plan for maintenance (monthly testing, annual updates)
The Bottom Line
Camerabewaking apps have democratized professional-grade surveillance. What once required expensive professional systems costing $10,000+ is now accessible to homeowners for $500-1,500.
The technology works. The security is sound (when implemented properly). The ROI is real.
The only question left is: What are you waiting for?